FreeBSD, SSL, Apache, Let’s Encrypt & certbot

Here’s my notes for getting SSL certificates installed on FreeBSD 11.2-RELEASE-p2 with Apache 2.4

The following links were used to compile the information I used:

https://certbot.eff.org/lets-encrypt/freebsd-apache
https://danm.io/2016/07/08/how-to-configure-letsencrypt-on-freebsd-with-jails.html
https://www.tecmint.com/install-lets-encrypt-ssl-certificate-for-apache-on-freebsd/


Install certbot using the pkg system:

pkg install py27-certbot

Create the certs, substitute in the proper web root path’s and domain names you want certs for:

certbot certonly --webroot --webroot-path /usr/local/www/apache24/data/ -d josh-weatherly.com

The certonly parameter tells certbot to not touch any apache config files, –webroot-path is for where the files get temporarily written so that the certbot servers can verify ownership of the domain. These files will only exist during the certificate creation process then get cleaned up after.


Copy the certs out to the directory where Apache can use them:

cp -L -R /usr/local/etc/letsencrypt/live/ /usr/local/etc/apache24/certs/

Configure Apache to use the certs in the new directory
In httpd.conf I had to uncomment the following lines (each in slightly different parts of the file):

LoadModule socache_shmcb_module libexec/apache24/mod_socache_shmcb.so

LoadModule ssl_module libexec/apache24/mod_ssl.so

Include etc/apache24/extra/httpd-ssl.conf

Then in extra/httpd-ssl.conf told apache to listen on 443, and that I only want TLS 1.2 by the following:

Listen 443
SSLCipherSuite HIGH:MEDIUM:!SSLv3:!kRSA
SSLProxyCipherSuite HIGH:MEDIUM:!SSLv3:!kRSA
SSLHonorCipherOrder on

#TLS 1.2 Only
SSLProtocol TLSv1.2
SSLProxyProtocol TLSv1.2
SSLPassPhraseDialog  builtin

SSLSessionCache        "shmcb:/var/run/ssl_scache(512000)"
SSLSessionCacheTimeout  300

Then added my VirtualHost settings pointing to the cert and key files generated by certbot:

<VirtualHost _default_:443>
 DocumentRoot "/usr/local/www/apache24/data"
 ServerName josh-weatherly.com:443
 ServerAlias www.josh-weatherly.com
 ServerAdmin you@example.com

SSLEngine on
 SSLCertificateFile "/usr/local/etc/apache24/certs/josh-weatherly.com/fullchain.pem"
 SSLCertificateKeyFile "/usr/local/etc/apache24/certs/josh-weatherly.com/privkey.pem"
<FilesMatch "\.(cgi|shtml|phtml|php)$">
 SSLOptions +StdEnvVars
 </FilesMatch>
 <Directory "/usr/local/www/apache24/cgi-bin">
 SSLOptions +StdEnvVars
 </Directory>
BrowserMatch "MSIE [2-5]" \
 nokeepalive ssl-unclean-shutdown \
 downgrade-1.0 force-response-1.0
CustomLog "/var/log/www/josh-weatherly.com-ssl_request_log" \
 "%t %h %{SSL_PROTOCOL}x %{SSL_CIPHER}x \"%r\" %b"
</VirtualHost>

And then restart apache with:

service apache24 restart

After this we should be able to go to the web page in a browser to verify the certificate is being served up properly.


Certbot has an option to automatically renew any certs, this is especially usefull since they are only valid for 90 days, so the following script can be used to automate the entire process. It will check if any certs are about to expire, automatically renew them, then copy the certs to the folder where apache will read from. Create it and place it in /usr/local/etc/periodic/weekly

#!/bin/sh

/usr/local/bin/certbot renew

if ! diff "/usr/local/etc/letsencrypt/live/josh-weatherly.com/fullchain.pem" \
 "/usr/local/etc/apache24/certs/josh-weatherly.com/fullchain.pem" >/dev/null 2>&1; then 

   #copy new certs to apache's location
   cp -L -R /usr/local/etc/letsencrypt/live/ /usr/local/etc/apache24/certs/
   # Restart apache
   service apache24 restart
fi
HTML Sites for Beginners

I was asked to show one of our new programmers around how to build a website and they didn’t have any experience in the area yet, so I did a little digging to find some beginners guides to HTML:
  • Read HTML Beginner/Intermediate, CSS Beginer/Intermediate
  • The advanced HTML isn’t really needed for us (though it can’t hurt)
  • Advanced CSS, Display & Page Layout are important to know
  • Read the current top voted answer ‘Learn Simple Things First’
  • Another good site with various tutorials across a wide range of topics
  • Great tutorials though a little outdated when it comes to current best practices

Visual Studio Find and Replace with Regular Expressions

One of the latest neat little features I’ve started using is Visual Studio’s Find & Replace function but using regular expressions for the search terms, for example:

Find what:
\.Item\("{(:a|_|-)*}"\)
Replace With:
!\1
Converts
.Item("cState")
Into:
!cState

If we were to break down what each regex is doing we would have the following:

In our first expression we have \.Item\("{(:a|_|-)*}"\)
  • The :a is a VS shortcut for [a-zA-Z0-9]
  • (:a|_|-) groups it with the underscore and dash giving us the effect of ([a-zA-Z0-9]|_|-)
  • * matches 0 or more of the previous expression

Now the special chars:

  • the {} tags the expression so we can use it as a variable in our replace box.
  • the replace box just has !\1, where \1 refers to the first tagged expression in our find box, if we had multiple {} in the find string, we could address them accordingly with \2, \3 and so on.
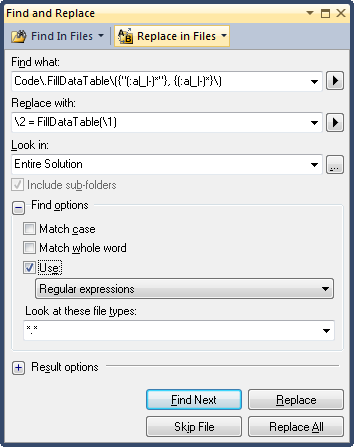
Here’s a second example using multiple tagged expressions. Another time I was refactoring a sub routine into a function.  Previously the sub was taking in a datatable by reference and modifying it locally, but now it was returning the datatable.  So every where the method was being called needed to be altered in pretty much the same way.  The following terms made the rest of my refactoring chore much easier:
Find What:
Code\.FillDataTable\({"(:a|_|-)*"}, {(:a|_|-)*}\)
Replace With:
\2 = FillDataTable(\1)
findreplace
Takes code of the format:
Code.FillDataTable("usp_FillStates", dtStates)
and changes it to:
dtStates = FillDataTable("usp_FillStates")
Thanks to the find/replace feature this saved me a bunch of time!

My Essential Programs

I’ve decided to post up a list of my essential applications.  These are a collection of little utilities that make my computing experience much more enjoyable.
Windows Tools:
StrokeIT – Mouse Gesture Application
AutoHotkey – Keyboard Automation & Global Hotkey Management
Launchy – Free, cross platform utility for launching programs, documents, project files, and bookmarks from the keyboard.
7zip – free WinZip replacement
PDFCreator – “Print” to PDF Files  (not recommended due to spyware)
BullZip PDF Printer – “Print” to PDF Files
BeyondCompare – File Comparison Tool
grepWin – search/replace text files
Renamer – Batch File Renamer written by Albert Bertilsson
System/Process Debugging Tools:
ProcessExplorer – Detailed Running Process Information
ProcessMonitor – Detailed System Event Viewer
TCPView – Views Open TCP Connections
FileMon – Monitors File System
Wireshark – Network Monitoring Tool (Sniffer)
WinSpy++ – Find Window Handles
Reflector – .NET Disassembler
SoapTrace – Capture SOAP Transactions
Shexview – Shell Extension Viewer
Misc Tools:
TortoiseSVN/Subversion – Source Control Client/Server
DropBox – Distributed File Synchronization Tool
PuTTY – Remote Access (SSH)
KeePass – Password Management Tool
WinSCP – Secure File Copy
“Fun” Tools:
Flickr Uploadr – Picture uploading tool
Electric Sheep – Screen Saver
Online Tools:
Lovely Charts: Free online flow chart/diagram making

Visual Studio 2005 Unable to Drag Yellow Arrow – Solution Found!

Finally found a solution to a problem that was annoying me for soo long!

After getting my new PC at work and going through the various options in VS 2005 getting it setup as I wanted I found that one little feature was not working as expected.  That is the ability to change the current execution point by clicking and dragging on the yellow execution arrow while debugging.   Whenever I would try, it would only toggle a break point at the current location.
An alternate to this is the ability to right click and choose Set Next Statement which would be the same behavior but takes a fraction of time longer and requires me to consciously think about it. I was just too used to dragging the arrow around…
The related setting is Options -> Text Editor -> General -> Drag and drop text editing
With this unchecked, the arrow can’t be moved with the mouse. Checking it solves my issue, I’d finally found it!

Visual Voice Mail with the Droid 2 & Google Voice

So I’ve had Google Voice for quite a while but have not really taken advantage of it.  I just recently got the Droid 2 and installed the Google Voice app from the market place. Verizon wants to charge $3/mo for their visual voice mail service, but with Google Voice it’s completely free! (as long as you don’t mind Google being able to data mine all your personal data.. but that’s for another discussion..)

Today I activated the voice mail forwarding and it appears to work rather well!

To enable voice mail forwarding dial *71<Your Google Voice Number>.  After you’ve done that, when someone calls your real number and you do not pick up, it will be redirected to Google Voice where it will ring once then ask them to leave a message.  The message will then show up in Google Voice with all the various goodies you’ve set up (Transcribing, SMS/Email notification, etc).

To deactivate the voice mail forwarding, simply dial *73 from your phone, and the forwarding will be removed.

Welcome!

My name is Josh.

I’m setting this up as my official presence on the web.  Figured I would make something a little more personal than some social networking site.

Still not entirely sure how this will all shake out, but this will have to do for now!